Gear Review: Black Diamond Firstlight Tent

The Black Diamond First Light tent has been my go-to tent while on guiding and personal climbing missions for the past 9 years. Many other guides I know use it as well. It’s certainly not a new gear item on the market and while I obviously am very happy with it, it is not the tent for everyone. It is a very lightweight single wall shelter that I find indispensible on most backcountry trips when a tent is needed.

It is modeled on the I-tent, a popular Bibler-designed alpine climbing tent. It weighs in at 3lbs 5oz (packed weight) and compresses down to 6 by 9 inches. It officially is a 2-person tent with one door. The poles are lightweight DAC Featherlight poles. It also has a zippered mesh window, which is so important because many times I only bring a tent because of mosquitos.

First of all, it is not waterproof. But does this really matter? Well, it depends. It is made of Black Diamond’s Nanoshield fabric which is “weather proof”, but not completely waterproof. The pros of not being waterproof mean the fabric is more breathable, lighter weight and more packable. It is highly water resistant and it will be fine in a light rain, hail and even a snowstorm. But put it in a wind-driven sustained rain storm and you will find leakage for sure (I ruined an iphone once because of this). So the fact that it is not fully waterproof will not matter if you are using it in cold winter environments, or in less rainy regions such as the Sierra Nevada. But it’s probably not the best Pacific Northwest tent.

At 27 square feet this is not a roomy 2-person tent, but it is a palatial one-person tent. So if you are looking for that tent for one and would like to actually sit up inside your tent and have room for some gear, then it is the right choice. Also, if you are a team of two looking to go very light and fast, and still need to bring a tent, then it’s also a good choice. One nice feature that makes up for some of the lack of space is the Firstlight’s steep wall design, which maximizes usable space. However, two people will be very cramped inside this tent, especially if you are over 6 feet.

Like many of this tents features, one other concern is also one of the tent’s strengths. The material is so lightweight that it is not very durable. My first Firstlight tent was destroyed when a gust of wind blew it over when I was setting it up with a partner (“I thought YOU had a hand on it!”). It tumbled only a few feet across granite but that was enough to put numerous holes on one side. The point here is to be extra careful with it, and it will last.

So, there’s the scoop from a 9-year veteran of the Black Diamond Firstlight tent. Bottom line is that if you are not in driving rain, you are not particularly large and are careful with it, this is one heck of a lightweight and compressible tent.

Dave Miller
Owner/Director
International Alpine Guides

Mountain Town Profile: June Lake, California

Those of us at International Alpine Guides are very lucky to be based in the beautiful resort town of June Lake, California. Perhaps one of the most beautiful mountain communities in the state, June Lake has all the climber, hiker and skier could ask for. My guiding and climbing takes me to mountain ranges around the world, yet when I return to June Lake and the Eastern Sierra I always have an even greater appreciation of what my home region has to offer. It is truly world class

June Lake is a small community of private homes, a few restaurants, a world-class spa and an exceptionally good microbrewery. All wrapped around four beautiful mountain lakes that are surrounded by 10,000 foot peaks. Located ten minutes off the main highway 395 in the heart of California’s outdoor sports mecca known as the Eastern Sierra, June Lake is a bit of a secret. And we kind of like it that way

There are many reason we love June Lake…Yosemite National Park a mere 30 minutes up the road, backcountry skiing literally right out our front door and  some of California's best rock and ice climbing just minutes away. The June Lake loop is best known as a fisherman’s hub in the summer and a quiet ski resort in the winter. But scratch the surface and you’ll find much more if you're looking for human-powered mountain adventures. Following is just a sample of the best climbing, hiking and backcountry skiing options we have in and around June Lake.

Rock Climbing

Drive thirty minutes from June Lake up Tioga Pass road and you will arrive at the Eastern entrance to Yosemite National Park. Tuolumne Meadows is the main area here and offers rock climbers some of the best rock climbing in a state that has the best rock climbing in the world. Climbing is on the famous granite domes in the Yosemite high country with everything from easy crack climbs to thought provoking run-out slab routes.

Just to the East of June Lake, you’ll find the rock climbing area Clark’s Canyon and it’s multitude of sport climbs. In fact, it may have the best selection of beginner sport climbs in the whole state. Climbing is on the volcanic rock that is so prevalent in the area East of Highway 395. Clark’s Canyon is situated in a whispering pine forest with splendid views of the high sierra. It is a great place to take the family for a rock climbing outing

Rock climbing on Stately Pleasure Dome above tenaya lake in Tuolumne Meadows

Rock climbing on Stately Pleasure Dome above tenaya lake in Tuolumne Meadows

Hiking

The hiking around June Lake is almost endless. In the June Lake Loop there’s a few great options such as the Fern Lake trail which switchbacks up an old glacial moraine to pleasantly quiet Fern Lake.

Another favorite is the Parker Lake trail, which goes for about 3 miles to spectacular Parker Lake. Although it’s a great late spring and summer hike the fall colors are a special treat for those hiking up to Parker Lake.

The Gem and Agnew Lake trail that begins at Silver Lake will take one as far into the backcountry as you would like to go, even all the way to Mount Whitney or the Canadian border as the trail joins up with the John Muir Trail and the Pacific Crest Trail.

Go just outside the June Lake Loop and once again you’ll find some of the world’s best hiking in the high country of Yosemite National Park. There are so many great day hikes here it’s hard to nail them down, but favorites would be the mellow hike up Lyell Canyon out from Tuolumne Meadows along the John Muir Trail. There’s also the hike within the Inyo National Forest from Saddlebag Lake to the 20 Lakes basin passing by, you guessed it, twenty small lakes.

There’s also backpacking galore. California’s high sierra is known as one of the world’s top wilderness backpacking destinations. June Lake is a great base for a backpacking trip into Yosemite and the High Sierra.

Fall Colors at parker lake

Fall Colors at parker lake

Backcountry Skiing

In June Lake we are lucky to have June Mountain Ski Area, a quieter alternative to nearby Mammoth Mountain. While June Mountain may be considered a smaller ski resort with mostly intermediate terrain, it has the best access to backcountry skiing in all of California. June Mountain has an open boundary policy, which means you are free to use the lifts and then ski out of bounds and into the backcountry. Of course, this is something only experienced and trained backcountry skiers should consider doing without a guide. Many hazards exist, not the least being avalanches.

The main backcountry skiing attraction here is what is known as "the Negatives". They are a series of Northeastern-facing bowls and chutes that come off of San Joaquin Mountain. The base of these chutes are easily accessed from the top lift at June Mountain. There’s also Carson Peak, which dominates the landscape in the June Lake Loop. The North facing Carson Bowl is a favorite which culminates with a ski down the “Devil’s Slide” that spits you out right at the hot tubs of the Double Eagle Spa.

On top of Carson Peak getting ready to ski down. Mono Lake in the background

On top of Carson Peak getting ready to ski down. Mono Lake in the background

For experienced skiers and boarders who are looking to get beyond the groomers and explore the endless backcountry there are local backcountry ski guides available to safely show you the goods and teach you the basics. Stores in nearby Mammoth Lakes rent backcountry ski equipment and split boards.

Ice Climbing

Ice climbing in California? You bet. The June Lake Loop and nearby Lee Vining canyon boast the best waterfall ice climbing on the West Coast. Ice climbing may seem very audacious, and it is. Donning crampons on their heavy boots and ice axes in their gloved hands, ice climbers have made a sport out of climbing frozen water. June Lake has the best beginner ice climbing routes in the state on Horsetail Falls at the far end of town and at Roadside ice just past the winter closure of Highway 158.

Ice climbing at Roadside Ice in June Lake

Ice climbing at Roadside Ice in June Lake

If you are looking for something a bit steeper you'll want to drive 30 minutes down the road to Lee Vining Canyon where you will find much longer and steeper ice climbing routes. Some of California’s hardest ice climbs will be found here. Hiring an ice climbing guide is a great idea if you want to give ice climbing a try. Ice climbing classes are available most weekends from late December till early March.

So there you have it, June Lake in California’s Eastern Sierra is not all just about trout fishing and skiing easy groomed runs. There is much more than meets the eye for the outdoor adventurer looking to get their adrenaline fix in the mountains. Just don’t tell anyone!

Dave Miller
Owner/Director
International Alpine Guides

Bears... Oh my!

A few weeks ago I got a voicemail from a neighbor that nobody who lives in the mountains wants to hear; especially when you're day three of a three week road trip. 'Morning neighbor, just calling to let you know that a bear broke into your house last night and pillaged your kitchen.' Awesome. Well I didn't say awesome, I think it may have been a string of incoherent profanities from the bed of the truck at 6:30 in the morning.

A little background here, I've worked as a wildlife biologist specializing in black bear behavior in Yosemite National Park and the Eastern side of the Sierra Nevada Mountains. Not only have I spent a lot of time studying black bear behavior, I've specifically worked on how to negatively condition habituated bears that are coming into contact with humans. Having a bear break into my house is about the equivalent of having a firefighter's house burn down. 


When I tell people this story, their first reaction is 'well thank goodness you weren't in the house, you could have gotten really hurt!' While that could have happened, the more likely scenario is that the bear would have seen me running out of my bedroom armed with my slippers and high-tailed it out of there. Bears are not out to get me, they are out to get my fully stocked refrigerator full of organic kale salad. And by that I mean cookies...and Peanut Butter Panda Puffs. 

I'm talking about the American Black Bear here, Ursus americanus; the smaller and more docile relative of the Grizzly Bear Ursus arctos. American Black Bears can be distinguished from their relatives by their general smaller stature, and more notably the size of their shoulders. Black Bears lack the classic Grizzly Bear shoulder hump. And while I've had people promise me that they saw a Grizzly Bear in Yosemite because it was brown, there are no Grizzly Bears in California anymore.

In fact, only about 2% of the Black Bear population in California are actually black. The other 98% can be shades of blonde, brown, or cinnamon. The American Black Bear is widespread throughout the country and like spending their time foraging for food and have no problem rocketing up a tree when scared. They're omnivores, meaning they eat grasses and berries but also eat grubs and meat. While not particularly active hunters, bears very opportunistic. I've seen plenty of bears scavenging deer carcasses that a mountain lion took down. 

What this translates to for people is that an opportunistic bear who has been habituated to people will probably not be shy about digging around in your pack. Think about it like this. If you had to forage for grasses and grubs all day just to make your daily caloric intake, how happy would you be if you found a backpack full of bacon, cheese, and 3,000 calories of Mountain House Meals? I would personally take the bacon.

Unfortunately, where there are people enjoying the backcountry there are typically bears enjoying that same backcountry too, and it happends to be their home. And while most bears want nothing more than to run away from you, there are those few bears that know what a human is carrying in their backpack. So what can you do? Bear proof canisters are the obvious choice and readily offered by most outdoor sporting shops. Some National Parks even rent them out when you get your backcountry permit. Regardless of where you get them, bear canisters are a proven method of effectively keeping bears out of your food. They are not always 100% effective, I did work with a bear once that figured out that if she pushed canisters into the river and over a waterfall, they would break open at the bottom and the feasting could begin.

Bears are smart, some people say as smart as toddlers. And their sense of smell is said to be five times greater than that of a blood hound. The way that I look at is this. If you're staying in a popular backcountry location where a bear has been known to get into food, you're probably going to get visited by a curious bear. You can be the most vigilant camper and have everything locked away in your canister, but the canister itself isn't smell-proof. They're going to be attracted to the smell even if the food reward is locked away. What I do in this situation is make a 'bear alarm.' Pile pots, pans, rocks, your set of hexes, anything that's loud on top of your bear canister.

If a curious bear stops by to investigate it will knock everything over, most likely scare itself away, and wake you up in the process. If you see a bear, yell at it, throw SMALL rocks at his or her rump or perhaps pound out Metallica's Master of Puppets on your air guitar. They really don't want anything to do with you! 

I hope I haven't painted a picture that all bears are out stalking backpackers and that you should be looking over your shoulder whenever you go out. This is most often not the case. Few people are ever lucky enough to see a bear in the wild.  We are so lucky to even share our space with such great and amusing creatures. I know I feel lucky when I get to stumble upon a wild bear rooting around a log looking for grubs, or watching a mother bear nap lazily with her two cubs in a tree. These are the bears that we need to protect, mostly from ourselves.

There are signs throughout Highway 120 in Yosemite National Park that say 'Red Bear Dead Bear' marking where a car has struck a bear and telling visitors to slow it down while driving the highway. And while speeding is a great danger and lethal to bears, I think feeding a bear is even more deadly. I always tell visitors to repeat this mantra while out backpacking; 'A fed bear, is a dead bear.' Feeding them night not seem as obviously deadly as a speeding car, but the trending behavior of a bear that is habituated to people is not a positive one. The solution is so simple. Store food properly, maintain a healthy respect for such impressive creatures, and let bears remain wild.

Adrianne Ghio
June Lake, California

Adrianne has worked as a wildlife management ranger in Yosemite Valley where she spent many a night stalking the Valley's bears and keeping them out of mischief.

Looking to maybe see a bear and other Yosemite wildlife this summer? Check out our Yosemite Hiking and Backpacking Tours

Skiing the Haute Route – What does it take?

If you’re a backcountry skier you may have heard of the famed Haute Route ski tour from Chamonix, France to Zermatt, Switzerland. You’ve probably heard tales of skiing through dramatic glaciated terrain, quaint alpine huts serving heaps of great food and the final ski descent into Zermatt under the Matterhorn. You may have thought, “Can I do that?” Well, here’s a run down on what skills you need to have to successfully complete the Haute Route ski tour.

The Haute Route is a 6-day point-to-point ski tour in the Valais Alps of Switzerland (Only the first half day is in France). The equipment used is telemark or alpine touring skis with skins, ski crampons, boot crampons and ice axes. It is true ski mountaineering. This is not a ski tour to be taken lightly and it is no place for cross-country skis or modified resort skiing equipment. It is not terrain that is suitable for splitboards, except for possibly the most skilled who are proficient at “skiing” their board in split mode. The areas of ability that matter fall into three categories: downhill skiing skills, backcountry skiing/mountaineering experience and physical fitness.

Downhill ski ability

The downhill skiing on the Haute Route is usually not too difficult and even the tricky sections are not very sustained. However, you may find yourself on icy steep sections (sometimes by headlamp) where a fall may not go well. And keep in mind that continuous falls on even easy slopes while high up in remote glaciated alpine terrain can catch up to you. In other words, you must be solid.

You must be an expert level skier that is comfortable linking solid parallel turns while skiing backcountry ski slopes equal in steepness to black diamond runs at a ski resort… in any conditions. And by that I mean deep powder, crud, crust, icy hard pack, choppy wind board, frozen avalanche debris, navigating tight trees… the whole gamut. While skiing high in the Alps you can encounter just about any condition imaginable. And there are the short sections of slopes that are double black diamond in steepness.

As for other specific skills needed, you should be very comfortable at controlled side slipping on steep hard snow and using the falling leaf technique. You must be well versed in the stem christie turn (a modified wedge turn). There is also the downhill kickturn, which must be mastered on steep terrain without falling over. Hop turns come in handy at times.  But above all you must be in control at all times. You don’t have to be the prettiest skier or the fastest, but you must be solid.

Backcountry Skiing and Mountaineering Experience

The skills and experience needed here are dependent on whether you are going on a guided Haute Route ski tour or tackling it on your own. For a guided ski tour you need to have experience using skins on steep and sometimes hard pack snow. You should also have had many backcountry ski days under your belt and possibly a previous multi-day ski tour. Overall, you need to have your equipment and systems dialed. As for mountaineering experience, not much is needed here if you are going with a guide as the guide’s expertise can make up for much of that and they will teach you the techniques you’ll need to know. The mountaineering done on the Haute Route is at a beginner level.

Moving beyond a guided ski tour and the level of experience and skills goes up considerably. For an unguided Haute Route tour, you should have many years of backcountry skiing experience and have been on numerous multi-day ski tours.  Experience skiing and traveling on glaciers is a must. You must be proficient in crevasse rescue techniques with skis and have had experience on steep snow climbs (up to 45 degrees) using ice axe and crampons. The high alpine terrain of the Haute Route is no place to be figuring these things out.

Also, do not underestimate the navigation skills required if tackling it on your own. It is easy to get complacent when you’re simply following the track in front of you for days until very suddenly you find yourself in a whiteout and the track has disappeared. You must be prepared with a whiteout navigation plan and be very skilled in using GPS, map, compass and altimeter for navigating. Putting together a written trip plan, such as is taught in avalanche courses, is important.

And then there’s avalanche training. The absolute minimum would be everyone in the group having taken a level-one avalanche course with level two being more appropriate. You must have the ability to evaluate the snowpack and the weather to make sound judgment calls. Keep in mind that the snow stability issues you may face in the Swiss Alps can be very different than what you have seen in your home range. Once again, this is not required for those on a guided ski tour.

Skiing your first Alps ski tour with a certified ski guide is an excellent way to gain the experience to ski tour in the Alps on your own. 

Physical Fitness

All of the above skills are for nothing if you are not in proper physical shape and are unable to complete the tour. Also, you do not want to be completing each section physically maxed out. You need to have reserves to enjoy yourself and for when things do not go as planned. Physical fitness is another area that is commonly underestimated.

Specifically, you should be able to climb up to 4000 feet a day on skis and travel up to 8 miles on skins with some reserve left over. On some days of the Haute Route you may need the stamina to slog it out for 8-9 hours straight, but most days are in the 5-6 hour range with the option for more. The largest descent of the tour is about 6000 feet. You do not need to be a fast uphill skier or climber, just steady. However, there may be times when the pace needs to be picked up for safety reasons.

hr blog (3).jpg

Altitude does play a role, although the tour is mostly below 11,000-12,000 feet. It’s an excellent idea to spend some time skiing in Chamonix prior to the tour to gain some acclimating. Once again, moving slow and steady is key with altitude. Look for a future blog post on physical training for long Alps ski tours.

So there you have it. If you feel you may be borderline on some of the above, keep in mind the season for the Haute Route ski tour is mid March to end of April so that gives you almost a full season to work on any weakness'. The Haute Route can be a wonderful adventure and a very rewarding experience provided you come prepared.

Dave Miller
Owner/Director
IFMGA/UIAGM certified ski guide

For more information check out our 2016 Haute Route Ski Tours

Peak Profile: Mexico's Pico de Orizaba

Mexico’s highest peak, Pico de Orizaba, is North America’s third highest peak behind the US’s Denali and Canada’s Mount Logan. Climbing Orizaba is a goal for many mountaineers and is the first international high altitude climbing expedition for many aspiring high altitude climbers.

Also known locally as Citlatepetl (or star mountain), Orizaba is one of only three Mexican peaks that support glaciers. Orizaba is a huge stratovolcano that is currently dormant with the last eruption recorded in the 19th century. Located about 120 miles East of Mexico City, Orizaba straddles the Central Mexican states of Puebla and Veracruz. It’s flanks boast North America’s highest permanent settlement, the village of Hildago at over 11,000 feet, and North America’s highest road at 15,200 feet. The first ascent of Orizaba is credited to two American soldiers in 1848 during the American invasion of Mexico that year.

There are numerous climbing routes on Orizaba with only two that see significant traffic. The North side via the Jamapa Glacier is the most common route, but the South face route sees many ascents and with the right conditions it can be the easiest and most straightforward route to the summit.

The Jamapa Glacier route on Orizaba is accessed from the small farming town of Tlachichuca on the West side of the mountain. A two-hour four-wheel drive road takes you to the base camp of Piedra Grande at about 14,000 feet. There is a primitive large hut and tent sites located here. From Piedra Grande the peak is easily summited with about 4400 feet of elevation gain and without the need for a high camp. Setting a high camp on Orizaba is simply not a good idea due to the hazards of sleeping too high and the lack of comfort and sleep which can affect your summit chances.

From Piedra Grande you climb scree trails for a few thousand vertical feet before you arrive at the route finding crux known as the Labyrinth. The Labyrinth is an area where the glacier has recently receded and can be somewhat of a maze of small chutes and cliffs. Getting through this section in the dark has proven quite a challenge for many climbers. Once through the Labyrinth, you soon arrive at the Jamapa Glacier at around 16,800 feet. The Jamapa glacier route starts out a mellow angle of only about 20 degrees and slowly steepens up to about 40 degrees. Climbing this part of the route at sunrise is spectacular with the central Mexico plain spread out 10,000 feet below you. Once off the glacier you arrive at the crater rim at over 18,000 feet which you follow for about 20 minutes to the true summit of Orizaba.

The Jamapa glacier is basically a non-crevassed these days so there is no need to employ glacier climbing techniques such as long roping where the rope is stretched out 30-40 feet between climbers. In fact, this type of roped climbing on Orizaba only increases the hazard as it makes it much harder to arrest a climbing partner’s fall. The main hazard is falling on hard snow. Sometimes the snow can become hard and somewhat icy and a fall could result in an 1800-foot slide down the glacier. While guiding we employ a “short roping” technique to stop our guests from taking falls. Climbers on Orizaba should be proficient in the use of ice axe and crampons with some previous experience climbing at altitudes up to 14,000 feet.

The South face route is usually accessed from the town of Ciudad Serdan. The trailhead is much higher at 15,200 feet and the route to the summit is much less distance making the summit day much shorter. I have climbed both routes and I would say that the South Face is a much more straightforward and easier route to the summit of Orizaba. However, the South face is non-glaciated and you must have sufficient snow on the upper slopes otherwise the climbing is on 40 degree slopes of ball bearing loose rock which is can be very tedious at best and downright dangerous at worst. So the South face is a route that must be in good condition or it’s a no go. One added attraction of the South Face is the mutt Citla Tepetl, a friendly Mexican dog who sometimes will follow climbers all the way to the summit and has his own Facebook page.

The elevation of Orizaba is very high at over 18,000 feet as are the car-accessed trailheads. This requires one to very carefully respect the altitude. Many climbers from North America and Europe will fly into Mexico City and then immediately travel to one of Orizaba’s trailheads over 14,000 feet… a very bad idea. Going from sleeping at close to sea level to sleeping at over 14,000 feet in 1-2 days is only asking for trouble. At best you may get altitude sickness and have a wasted climbing trip. At worst, you could get a more serious and life threatening illness such as HAPE or HACE. Climbers on Orizaba have lost their lives to serious altitude illnesses.

Proper acclimating is key and by far the best way to acclimate is to climb lower peaks first. Not only does this add to your peak list, it is a great way to see more of the country. The most ideal acclimating peak for Orizaba is the 14,600 foot volcano La Malinche near the city of Puebla. La Malinche is on the way to Orizaba, has cozy cabins to sleep in at the trailhead (which is located at an ideal 10,000 feet), and is a mellow hike to the top that does not require crampons or ice axe. For those with more time, Iztaccihuatl (17,000 feet) is another great peak to climb before Orizaba.

I have been guiding Pico de Orizaba for over ten years and while I do not find it to be a difficult peak I do find it to be one of the most aesthetic climbs around. That, combined with experiencing the rich Mexican culture of Central Mexico makes this trip one of my favorites.

If you are interested in a guided trip to the Orizaba and the central Mexico volcanoes check out our Mexico Volcanoes Trilogy or our Orizaba Express trips.

Dolomites Off Piste Skiing - The Good Life In A Skiers Nirvana

Over 450 ski lifts under one lift ticket (not a typo) that stich together an entire region. Countless numbers of couloirs. 6,000 foot glaciated powder runs. Wide endless valleys. One could travel for weeks from town-to-town and valley-to-valley solely on ski lifts and not ski the same run twice. All with stunningly beautiful scenery and some of the World’s best cuisine. No, I’m not describing a mythical skiers nirvana. Just talking about the Dolomites, a very real place nestled in the South Tirol of Northern Italy.

I recently had the opportunity to scout a completely different type of backcountry ski experience. The journey began on the canals and waterways of Venice, Italy, about as an unlikely a place to begin a ski trip as could be imagined. In the bustle of the Piazza San Marcos I met up with my good friends Gregor and Erica from Reno, Nevada.  Soon we were loading skis and bags onto a water taxi and were headed for Cortina d’Ampezzo in the heart of the Dolomites, a mere two hours away.

Skiing Venice

Cortina, home of the 1956 winter Olympics, has all the small town ritz one would expect of an upscale Italian mountain resort. It’s not uncommon to see paparazzi shadowing a celeb along the main pedestrian walkway. In fact, many people come to Cortina to simply idle away the days in the boutiques and sip Aperol spritzes in the cafes, with skiing being a mere distraction. However, scratch just under the surface and you’ll find that Cortina is a very real ski town with very real terrain and a rich history of skiing.

We packed everything for six nights into our 30 liter backpacks and purchased our 7-day Dolomiti Superski Pass which gave us access to 460 lifts (came out to about $45 per day). The next morning we launched off from Cortina onto the largest ski lift system in the world in search of good backcountry skiing (known in Europe as “off-piste” skiing). A world of couloirs, powder and adventure awaited us.

We immediately found ourselves in complete whiteout trying to find our way down groomed runs by braille. It was clearly time to head to the nearest high mountain hut, or “rifugio”, for lunch. The closest happened to be the Rifugio Averau, located at the top of a ski lift and known to be the one of the top ten mountain restaurants in the Alps (There was a Maserati in a clear plexiglass box just outside the front door). After enjoying what was one of the top three steaks of my life and washing it down with the local wine varietal known as Lagrein, we launched back into the howling whiteout.  With a compass and a ski resort trail map we found our way to the top of the Lagazuoi cable car, our destination for the night. The Rifugio Lagazuoi is perched on the top of a large limestone cliff formation that was directly on the front lines of World War One. After enjoying more excellent food and wine prepared by a guy in a chefs hat we settled into our private rooms for the night and were lulled to sleep by the roar of the tempest outside the window.

Rifugio Averau

One of the advantages of skiing in the Dolomites is that even in the worst of weather there is usually something to ski. No sitting around a backcountry hut with nowhere to safely go or moping around town waiting for flying weather. Due to the massive amount of marked runs and the extensive lift system you can still ski something.  And as any experienced traveling backcountry skier knows, that is huge. So waking up to more whiteout the next morning we found ourselves skiing down one of the most famous groomed runs in the world that winds down from Lagazuoi into Alta Badia past towering dolomite limestone formations. And not one other skier in sight. The run just simply ends over three thousand feet below with the nearest ski lift a mile away across flat terrain. That’s where the guy with the horse lift comes in. For a mere two Euro you are dragged by a horse-drawn sleigh across the valley to the nearest ski lift in the tiny hamlet of Armentarola and are once again connected to the Dolomiti Superski. Pure magic.

Alta Badia Horse Ski Lift

We then proceeded to ski lift after lift (with a cappuccino stop of course) for the entire afternoon to our next destination, the small village of Arabba. Arabba is located within striking distance of our next quarry – the high glaciated off-piste runs of Marmolada. With the weather finally breaking and fresh powder up high we bolted first thing the next morning for the Marmolada cable cars, three of them actually, which whisk you up over 6000 vertical feet to near the highest point in the Dolomites. After a 26,000 vertical foot day skiing mostly off-piste powder up high we boarded our sore thighs onto chair lifts and traveled to our next destination – the funky Rifugio Fredarola at the base of the Sella Massif.

Skiing Marmolada

Fredarola sits perched on the side of a massive valley just off a offering cozy private rooms each with expansive views of Marmolada. I’m pretty sure I made out some of our tracks from the picture window of our room. The next morning we woke up to bluebird skies – it was game on. Skiing away from the front door of our refugio before the lift starting spinning, we made it to the Piz Pordoi cable car at opening. We opted for a morning run down the Val Lasties, a classic off-piste valley run that takes you towards the Sella Pass and deposits you at a roadside rifugio with great cappuccino and a friendly dog.

Rifugio Fredarola

After the caffeine break, it was down a "squirrel trail" that spit us back onto a groomed run and down to the nearest chair lift. Eventually it was back up the Piz Pordoi cable car to sample one of the steep couloirs the Sella Massif is known for. We chose the “Canale Joel” or Joel Couloir, which has a nice steep entry at about 45 degrees, but quickly pinches down so narrow and with such steep walls on both sides that parts of it never see the sun even though it is South facing. Afterward, it was back to the Fredarola for a well-earned Aperol Spritz in the “ice bar”… a bar completely carved out of the snow and ice with a lively Euro-style après ski scene. Life you could say was good.

Dolomites Off Piste Skiing

Another stellar day of splitter clear weather found us in the famous Val Mesdi, a long North facing valley that is accessed from the top of Piz Pordoi via a 30-40 minute skin or walk. The ski of the Val Mesdi takes you across the entire Sella Massif into another valley of the Alta Badia. On the descent we enjoyed some surprisingly great pockets of powder on the way down to the town of Corvara. Upon arriving in Alta Badia you notice a different feel. No longer is Italian the predominate language, German is spoken more freely and sign posts also show a third language unlike either German or Italian. The Sud Tirol Region in which the Dolomites reside was once Austria prior to WWI and today is a semi-autonomous province that keeps it a bit separated from Italy. To complicate things more, a third language, Ladin, is the first language of most people in Alta Badia (and other valleys) and is spoken by over 30,000 people.

Dolomites Ice Bar

After a week of traveling almost solely on skis with ski lift support we made our way back to Cortina. On our final day we enjoyed yet another fantastic backcountry off-piste descent that took us through a WWI tunnel and to yet another final gourmet lunch atop the lifts at Cinque Torri. This kind of living was getting too good, It probably had to stop. But now I know where I want to go when I die.


Dave Miller
Owner/Director
IFMGA/UIAGM Mountain & Ski Guide

We are offering the Dolomites Off Piste Skiing Adventure in March 2016

Glaciers Of The Sierra Nevada

Does the Sierra Nevada of California have glaciers? Yes, and quite a few of them at that. While the Sierra glaciers are generally quite small, they are great in number. Hard to say how many exist today, but studies from about twenty years ago show more than 130 glaciers in California and most of those in IAG’s home base of the Sierra Nevada.

What is a glacier? A commonly accepted definition calls a glacier a body of ice that moves. If it is a permanent snowfield that creeps downslope or a stagnant body of ice that just stays still, it is not a glacier. Many of the Sierra glaciers lack some of the features present in their cousins found in other mountain ranges of the world such as extensive crevasse fields and ice falls, but glaciers they are. All of the Sierra glaciers are what are known as cirque glaciers that occupy shady pockets high among the craggy granite peaks.

How old are they? Not very…in geological terms. In fact, 800 years ago it’s safe to say there were no glaciers in the Sierra Nevada. All of our Sierra glaciers are a result of what is known as the “Little Ice Age” which occurred approximately from 1450AD through about 1850AD with it’s peak probably about 200 years ago. During that time much of the Northern Hemisphere saw a period of glacial advance as temperatures cooled and precipitation increased (In the Alps of Europe glaciers even invaded inhabited valleys such as the Chamonix Valley in France). Of course there were many larger glacial periods or “ice ages” stretching back hundreds of thousands of years with the last large one about 10,000 years ago. But 900 years ago there wasn’t a glacier to be found in the High Sierra.

Who discovered them? John Muir, the iconic early environmentalist, mountaineer and amateur geologist, is credited with discovering the first glacier in the High Sierra. In 1875, acting on a hunch, he simply placed markers on the ice and then came back at a later time to find they had moved downslope. He was ridiculed by the academics of the day because he had no formal schooling. But he was right, as he was about many other things concerning his beloved range of light.

How are they doing? Well, they are all receding as our current climate is not conducive to the maintenance of glaciers. However, many folks may be surprised to learn that not all glaciers are visible and some glaciers thought to have melted away may simply be hiding in plain sight. Glaciologists have fairly recently discovered the phenomenon of rock glaciers. These are moving bodies of ice that are completely covered in rock debris with little or no ice showing on the surface. As they move down slope they carry their blanket of rock with them. Most of these were full glaciers that melted and receded away until the only part of them left was under the very rock debris they created. The Sierra Nevada apparently has many of these. The boulders (talus) that cover these rock glaciers shield them from solar radiation, which prolongs their life. Even visible Sierra Nevada glaciers are usually larger than they appear since the lower end, or snout, of the glacier tends to burrow under rock debris and to not show any ice.

Are they difficult to climb? Not especially. The techniques we use for climbing the glaciers of the Sierra Nevada, are not the traditional glacier climbing techniques such as “long roping” in which teams travel 25-40 feet apart to protect against a trapdoor crevasse fall. This is mainly due to the fact that almost all of our glaciers have no crevasse fields. However, just about all of them have what is called a bergshrund. This is the large crevasse at the top of the glacier where it separates from the non-moving ice above it. These “shrunds” are usually the only crevasse on a Sierra glacier and can occasionally prove tricky to negotiate, sometimes requiring technical ice climbing skills. 

The small glaciers of the High Sierra Nevada are well worth exploring!

(If this article has peaked your interest in California’s glaciers (or glaciation in general), a recommended read is the book “Glaciers of California” by Bill Guyton. University of California Press).

Tips to Help You Find the Perfect Climbing Partner

Seeking new climbing partners can feel a bit like gambling, though it doesn’t have to be as risky a crapshoot if you know how to play the game right.  Whether you’re seeking to broaden your network of climbing partners or you're new to a gym/climbing area, below are guidelines to aid you in your quest to forge stable and successful climbing partnerships:

DO!

Own Your Experience.
When creating new partnerships, communicate clearly and honestly about your climbing experience.  A positive and enthused demeanor and honesty up front will get you far in this sport, and Novice and Advanced Climbers will embrace newer climbers if they’re specific about their current experience.

Tell the Truth.
Misrepresenting one’s experience is never appropriate and is often transparent to everyone save the offender. This goes for both ways, as more experienced climbers sometimes misrepresent their climbing experience as well. Feel free to ask around to pre-qualify potential new partners.

Define Your Terms.
It’s an arrangement, an appointment, a role, a contract. Lay down the terms and see who steps up. Clear communication gets the job done, is usually infectious, and will probably set the tone for an absolutely delightful climbing adventure.  Examples:

“Free to top rope climb at Planet Granite, 7pm tonight?”
“Anyone want to climb 5.10 mileage at the central Gorge this Friday, 7am to 12pm?”
“Climb in Pine Creek Mondays, 9am to 1:30pm?”

Show up On Time and Prepared.
Pack the night before. Leave your house early so you’ve enough time to finish your time-sensitive errands. Do your homework and arrive prepared.

Climb with New Partners.
You may learn something. You may meet new people. You may realize you’re in a slump in the former climbing partnership. You may need a break from your adventure partner or life partner. The possibilities are endless, and collaboration helps us evolve as Climbers and People.
____

While the above guidelines will likely be matched with appreciation, minor annoyances as listed below can be abrasive and counterproductive.  Thus:

DON'T

Send the Wrong Message.
Cues are sometimes hard to notice, but here’s an example: if someone can’t remember what their hardest rock climb was, whether they top roped it or lead it, where or when it was, they are likely misrepresenting their climbing experience.

Be Repetitively Late or Ill-prepared.
Free time is expensive and shouldn’t be wasted. Don’t make your partner wait at the trailhead while you’re waiting in line for a cappuccino or sorting through your disheveled life scattered about the back of your truck.

Be Late Again.
You're already running late.  Don't misrepresent your second estimated time of arrival and be late again i.e. don’t fib on the new texted ETA and show up 25 minutes late instead of 10. Your honesty could give your partner extra time, perhaps best used to wait in line for a second cappuccino instead of empty-handed at the trailhead.

Use a Climbing Appointment as ploy to hook up, unless otherwise stated.
Although some climbing partnerships become life partnerships, don’t only climb or attempt to climb with persons who you want to date. Desperation is transparent and unattractive.

ADDITIONAL RESOURCES

Hire A Guide

Join a Gym/Club

Find Climbing Partners
ClimbFind
Rockclimbing.com Forums
____

Perfect climbing partners are extraordinarily invaluable and can produce a wealth of climbing adventures.  All had to start somewhere.  Enjoy the process!


Be the Best Belayer Ever

Whether you’re introducing climbing into your repertoire of adventurous hobbies or you’re already a veteran of this glamorous sport - if you’re hooked like the rest of us, you’re likely striving to achieve your personal best. How we evolve into the Best Climber we can be is dependent on many, seemingly ungovernable factors such as strength, athletic ability and technique.  Conversely, how we evolve as Belayers is totally within our control.

While our climbing performance can fluctuate wildly from one day to the next, every time we belay we should be performing consistently and at our best.  Consider the alternative: the consequence of performing subpar as a belayer can cause safety hazards, undue stress, loss of friends or friendships, loss of climbing days.

Essentially, no one wants to be belayed by a bad belayer.  Thus, half of striving to achieve our personal best within the sport of Climbing should also be evolving into the Best Belayer we can be.

For the past weeks, I’ve climbed with strangers and friends alike, and used their experience as resource for this blog post.  When interviewed, an overwhelming amount of seasoned climbers described their Perfect Belayer as PresentAttentive, and Communicative – all key points we’re discussing today.

To build the best belayer, we must first lay the foundation of Technique and Knowledge.

The Will to Learn

During a climbing trip to Rifle, while belaying I noticed I would (annoyingly) occasionally short the climber rope.  Once, it happened to a friend who scolded me and asked to be lowered off his project.  I apologized and said it was happening more often with the new GriGri 2.  He asked if I had watched the instructional video on how to belay with the new design. I drove into town that afternoon, found internet and streamed the video. With new insight, I returned to the crag and convinced my buddy that I had overnight become the best belayer I could be. Everyone lived happily ever after.  The End.

As much as possible, both our climbing ability and our belaying ability should evolve simultaneously and with an equal amount of Importance and Intention.

The learning process is collaborative and includes having knowledge about:

  • How to appropriately use your equipment;
  • Setting up or stacking the rope appropriately; and
  • Setting up your stance appropriately.

Of course, one’s ability to learn anything is completely dependent on how much they apply themselves to the learning process.

Today, the average consumer researches 89% of their purchases, myself included.  Most of the items I am researching are not equally researched by their manufacturing entities, proven by the large percentage of returns Amazon.com may receive from my house each month.

Uniquely, the climbing equipment manufacturing industry researches 100% of their manufactured climbing hardware, including belay devices.  Further, said test results are published online, for free, usually alongside similarly useful manuals and instructional videos.

While not overwhelmingly dramatic and exciting for some (myself excluded), said resources are incredibly helpful in strengthening one’s belay technique. Free knowledge! 

 Own Your Role: The Expert Support Crew

"You miss 100% of the shots you don't take."  Wayne Gretzky

How did Wayne Gretzky achieve multiple career records of most regular season goals (894), assists (1,963), points (2,857), and hat tricks (50)?

How would Mario Andretti have taken home 12 Formula One championship trophies without a stellar support crew?

How do Chris Sharma, Joey Kinder or Lonnie Kauk repeatedly establish and send hard routes?

The commonality between Gretzky, Andretti, Sharma, Kinder and Kauk is behind all their exceptional successes, these athletes have solid Support Teams made up of people striving to use all their resources and capabilities to execute their supportive role flawlessly, expertly.

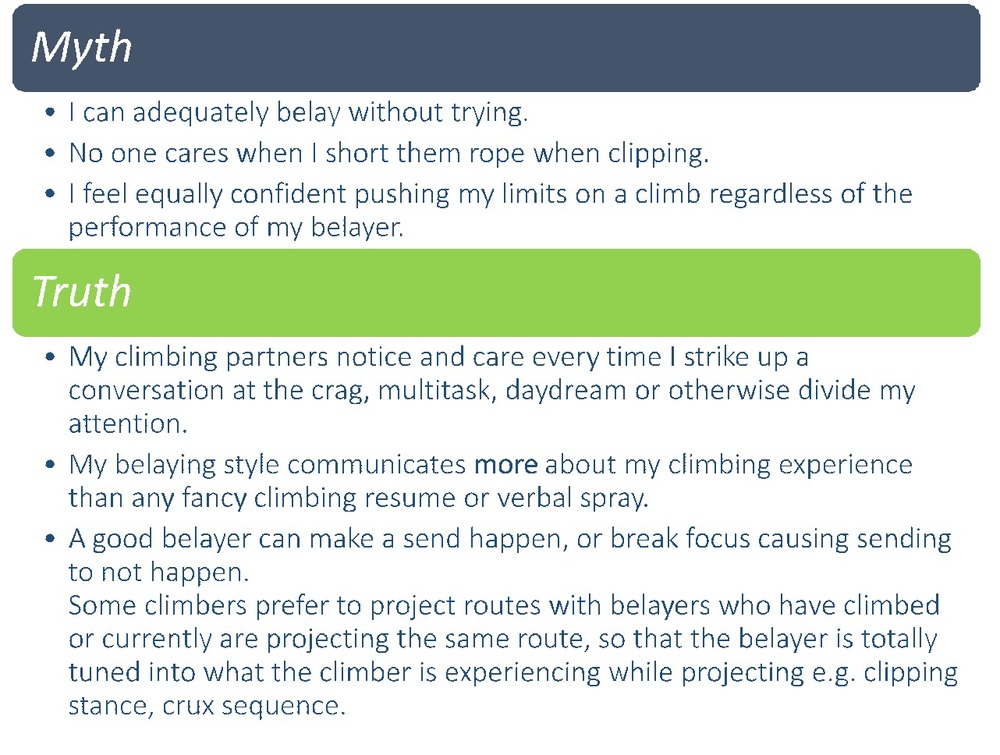
Consider Belaying as similar to being a Support Team to a climbing partner.   As a Support Team, the belayer must be alert, physically available, and have intention for the moment.  When not any or all of these things, the Climber is the one that pays the price.  Similar to any athlete, no Climber performs better when their focus is compromised.  A short catch, a shorted clips, blatant daydreaming or inappropriate crag chat all can translate up the rope to the climber that the belayer has clocked out.

Last night I projected a route at a local crag with a new climbing partner. While I was working the crux, he asked me what else I wanted to climb next, you know, after I was finished with the climb he just projected. He went onto suggest a few routes, not noticing that I wasn’t interested in discussing a future beyond my current project. Consequently, his belay sucked, e.g. the rope was too tight, and a few times when I requested slack or tension and received neither, I looked down and saw him staring off into the distance, seemingly daydreaming. Later we chatted about where his head was at.  He admitted to be totally checked out, bummed that he didn’t send, and was about 5% concentrating on belaying. We laughed it off over a beer.

Some climbers want to be koo’d, talked to, coaxed on, roasted, yelled at, coached.  Some want silence. Some want beta and others do not.  Some want the rope tight when projecting, and others want a slack system to give them room to maneuver.  Some want both at different times.  A good belayer recognizes all of this and does their best to accommodate the preferences of the climber, not themselves.

Communication

One of our local crags is the Owens River Gorge, a climbing area known for single pitch sport routes. Most of the climbs have been established or retrofitted with a mussy hook anchor system, which avoids the need for a climber to rethread or rappel off the anchor.  Rarely do you hear “Off belay” spoken at the ORG, so it surprised me when a death at the crag occurred when a climber/belayer duo misunderstood each other.  The climber told the belayer “off belay” which was heard by neighboring parties, and the belayer followed instruction, however the climber leaned back as if to lower.  Unfortunately, the climber didn’t survive the fall.

In the AAC’s 2013 Accidents in North American Mountaineering publication, it was reported that 22% of climbing accidents related to Lowering Incident are caused by Miscommunication.  Factors that can interfere with climber/belayer communication are:

  • Crag noise e.g. people, pets, traffic, running water;
  • Wind and/or weather;
  • Differences in language or climbing commands;
  • Terrain factors.

All of above can happen relatively spontaneously and simultaneously.  Accidents are more likely to happen when one or more of these factors exist AND there exists no clearly defined plan of action. Thus, regardless if I am the climber or if I am belaying, I much prefer to discuss with my climbing partner our plan of action when we’re face to face rather than a pitch away from each other.  It takes a fraction of time to come up with a plan when both parties are face to face and is hugely more efficient than becoming the loud party stuck on a pitch trying to communicate “off belay” or “on belay” around a corner and 60 meters apart.  

In 2013, the AAC’s Accidents "Know Your Ropes: Lowering" article by Mike Poborsky speaks to proper communication techniques and suggests ways to eschew lowering accidents.   I highly recommend picking up a copy of this enlightening publication.

Consider it further Inspiration to be the Best Belayer You Can Be.

Next up, find the perfect climbing partner!


Tips & Techniques: Escaping the Belay 

Picking up where we left off, this week we’re highlighting a technique that is similarly useful to know on the occasion you are adventuring off the ground on a multi-pitch alpine route, mountaineering across glaciated terrain or climbing in a single pitch environment.  

Escape the Belay

Scenario:  Leader takes a fall.  The rope has been fed out past the halfway point or lowering the Leader would put them father away from you, the Belayer, and the anchor.  The Leader’s full weight is being held by your break hand and your belay device attached directly to your harness.  The first objective is to free your hands; next, transfer the Leader’s load to first a friction hitch; then, transfer the load from the friction hitch to the anchor.

Tools: Munter/Mule/Overhand combination, Friction hitch: Prusik or Klemheist
Equipment: 6-7mm 20’ Cordalette; 2 locking carabiners

1. Tie off Belay
 
Off of the back end of your brake hand i.e. hand that is holding/breaking the fall, pull a bite of rope through the belay device, and tie off the bite with a Munter onto the locking carabiner.  


Photo courtesy of Climbing.comAlternately, you can tie off the Munter hitch onto the load strand above the belay device (fig 15-17).  

This step frees your break hand for future tasks. 

2. Friction Hitch on Main Load Strand

Using your cordalette, place a friction hitch on the Main Load Strand (rope that is going from your belay device to Climber) at a location within arm's distance of yourself and the anchor.

I like using the Klemheist as a friction hitch here, however the Prusik would work just as well.  Your preference.

Secure the back end of the cordalette to the anchor using a Munter/Mule combination on a locked carabiner, then tie an Overhand knot to make the Munter/Mule catastrophe-proof.

(If you tie your cordalette with a double fisherman's knot, this would be the time that you regret using that knot as it will invariably get in the way in all applications of rescue.  However, if you tie the cordalette with a water knot, you may wish to maneuver the knot to be close to the friction hitch/load strand or close to the end of the cordalette.  Even better is to use an unknotted cordalette.)

3. Back-up Friction Hitch

On the back end of your belay device/Munter tie off (Step 1), secure the rope to the anchor using a Munter/Mule/Overhand combination onto a locked carabiner, making sure that the rope is underneath the friction hitch cordalette.  This system backs up the friction hitch in case of catastrophe.

4. Transfer load to Friction Hitch

Slowly lean towards anchor and friction hitch, unweighting your belay device, watching to ensure that the friction hitch is able to hold the entire load.  If the friction hitch is solid, you’re clear to untie the Munter and remove the rope from your belay device.  

Now, a large amount of slack will have built up between the friction hitch and the Main Strand Munter/Mule.  

5. Tighten Main Strand Munter/Mule

On the main strand Munter/Mule, untie overhand and mule knots, pop the Munter, remove the slack, and retie the Mule/Overhand.

6. Transfer load to Main Strand Munter/Mule

Slowly maneuver the friction hitch closer to the anchor, which will transfer the load to your main strand Munter/Mule.  

This completes the load transfer onto the main strand Munter/Mule.  From here, you're hands are free to execute whatever future steps required, such as rescuing the car keys from your clumsy partner, rappelling down, and grabbing a beer.  Pfew, close call!


Next up, Be the Best Belayer Ever!


Trip Update: Ecuador  


18 -19, June:
Traveling from long and far, our diverse team collided in Quito for a rejuvenating evening spent on the town.  The following morning, we ventured northeast, past Cayambe, to arrive at Puerto Lago, a stunning lakeside resort nestled at the base of tall volcanoes.  Here we spent the afternoon touring the countryside, playing billiards and catching up on World Cup futbol.

20 June
We set off through the Otavalan countryside to Laguna Grande, one of three high altitude lakes positioned at the base of Fuya Fuya (13986’/4263m), a mountain formed by two inactive volcanos sharing the same saddle.  Through tall grasses and groves of Andean pineapple, the team climbed to the East Summit and enjoyed lunch amidst views of the surrounding countryside.  We returned to Puerto Lago in time for the Ecuador vs. Honduras game. 

June 21
Today we depart for the town of Cayambe, where we will hire a local four-wheel drive vehicle to shuttle us up the road to Cayambe’s refugio as far as the road will allow.  From there, we will hike the remainder of the way, and set up camp near the closed refugio at (15092’/4600m).  We plan to spend two days and nights acclimatizing on Cayambe prior to going for the summit on June 24.  Si se puede!


Tips & Techniques: Backing up your Rappel  

Over Memorial Weekend, CAG hosted an Introduction to Traditional Climbing Course that covered three different climbing areas throughout the eastern Sierra.  The attending student had prior knowledge of rope climbing within a gym setting and no prior outdoor climbing experience.  His goal was to progress his ability to be a safe and effective outdoor climbing partner, as well as promote his movement and technique, so that he may climb outdoors with more experienced climbing partners.  Since the grand finale to the course was a multi-pitch route on the East Tower of Granite Basin, the following morning I met up with one of the climbers responsible for developing Granite Basin back in the 70s.  Over coffee, he recounted stories of the initial development of the Granite Basin climbing area, and we both shared stories of our unique introductions to the sport of Climbing.  Contrary to both our experiences, today’s generation is often introduced to climbing within a Gym setting, and may choose at some point to transition into climbing outdoors, or not.  After reviewing the course curriculum, my friend and I agreed that much of the techniques reviewed during the course we similarly learned (too) many years after we’d started climbing outdoors.  During our hour of reminiscing, I asked my friend at what point in his 40+ year climbing career he learned how to escape the belay, to which he replied, “Escape What?”

A few days later I shared a bench with another prominent figure in the climbing community while internetting in Yosemite Lodge.  I asked him what year he started climbing (1998) and when he learned to escape the belay.  “Er, I’d probably be able to figure it out, but no, I don’t know how to do that.”  Exactly.

While it seems logical that someone interested in becoming more knowledgeable about a sport would take an introductory course e.g. Sailing or Tennis or Kite-boarding, how many of us actually learn the basics of outdoors climbing at an appropriate time, such as when we started climbing outdoors?

My first climbing experience was on a low-angle finger crack in Tuolumne, where I learned to (flail) on Yosemite granite while a friend/mentor coached me while free-soloing alongside the route, after which we transitioned into a simul-rappel to expedite our descent.  Those first years I went onto simul-rappel off of most multi-pitch routes without awareness of possible dangers.  I shudder to think of all the times I rappelled off of one strand without the use of a rappel back-up, perhaps without knots at the end of the rope, especially in an area like Potrero Chico, well-known for loose rock and debris.  

It was far too long before I learned the basics of safe rappelling, and I am constantly inspired to make rappelling as safe as possible.  Perhaps the scenario of needing to remove oneself from a belay doesn’t happen that frequently, but the concept is incredibly helpful to know at any point in your climbing career.  Thus, the theme for my first post in the CAG/IAG Informative Blog:


Backing up your Rappel Using an Autoblock off a Leg Loop
Tools:
1 locking carabiner [C.A.M.P. Rescue Rigging Locking Biner]
Accessory cord: 7mm 13.5” [Sterling Hollow-Block]

I dedicate this equipment for its specific use - backing up rappels and lowers - and habitually store it on the aft-most harness gear loop, locked and out of the way from the more easily accessible gear loops near the front.  I recommend buying a biner that looks different from the rest of your equipment for quick recognition, and one that weighs next to nothing, so there’s no excuse not to always bring it.  Same theory with the material. 

Pros: Quick and easy to set up
Cons: Falliable – not catastrophe-proof*

Photo courtesy of Climbing.comAttach the locking carabiner to your leg loop, on the same side as your break hand.  Open biner, loop friction hitch material through biner, then wrap material three times in a downward spiral around rappel ropes.  Loop end of material back into biner.  Lock biner.

* What has been circulating around the guiding community is a trend towards not using an autoblock off of a leg loop because if the rappeller gets knocked unconscious, they may slump forward, and that motion may push the rappel device down towards their legs, which could cause the autoblock material to get jammed up in the rappel device and render the friction hitch useless.  See Using an Autoblock with a Belay Extension for another option to backing up your rappel.

Backing up your Rappel Using an Autoblock with a Belay Extension
Tools:
2 locking carabiners
1 rappel device
1 Double-length sling
1 locking carabiner [C.A.M.P. Rescue Rigging Locking Biner]
Accessory cord: 7mm 13.5” [Sterling Hollow-Block]

Pros: If set up correctly, this system should alleviate the possibility of the autoblock material becoming jammed in the rappel device because of the increased distance between them.  Plus, rappel extensions are convenient on multiple rappels.
Cons: Watch out that long hair doesn't get caught in chest-level rappel device


Photo courtesy of PetzlFirst, extend your belay using a double-length runner rated to 22Kn.  

Girth hitch material to harness.  

Tie overhand knot in middle of material so that when material is extended above you the knot is at chest level.


Next, use distant end of runner as a personal tether, attach to rappel anchor using a locking carabiner.  Place rappel device and locking carabiner in loop beneath knot in runner.  Next, set up rappel autoblock off of belay loop of harness.  

Photo courtesy of Petzl


Coming next!  Escaping the Belay 


Trip Report:

Mexico Volcanoes Trilogy + 1

10/24/13 - 11/3/13

I Just finished up a very successful Mexico Volcanoes Trilogy of Pico de Orizaba (18,451), Ixtaccihuatl (17,000 ft) and La Malinche (14,600 ft). In addition, two of the guests added on Nevado de Toluca (15,200 ft) to the beginning of the trip. We summited all the peaks!

The trip began with meeting John and Ken in Mexico City. The next day we met up with Guillermo "Huracan" Vidales, my good friend who with his brother owns our Mexico logistics company. We traveled East of the city through the city of Toluca and on to the slopes of Nevado de Toluca, where we did a short acclimating hike. After an evening in downtown Toluca (which has a very nice renovated downtown area), we drove back up to the trail head and summited Nevado de Toluca (15,200 ft) which is basically a walk up with no snow and just a little rock scrambling. During the climb we had amazing views of Nevados crater lake.

Then it was back to Mexico City for the night where we met up with our third guest Eric who was joining us for the normal trilogy. CAG guide Zeb Blais also joined us for most of the trip. Zeb was down here on a mission to ski Orizaba. Ken, who was only here for the first part of the trip, left us here to head home. The next day we traveled to the slopes of La Malinche via the mysterious pyramids of Teotihaucan. We also ate a gourmet Mexican lunch in a 100-year old restaurant called "La Gruta" located down in a cave.


After an evening in the cozy cabins at La Malinche we had a great hike up La Malinche and were rewarded with great views of our next two peaks...Ixtza and Orizaba as well as the very active volcano Popocatepetl. Then it was back in the van for an afternoon drive to our next acclimating spot in a resort and trout-rearing facility at 11,000 ft on the slopes of Ixta. After an excellent dinner of fresh trout and a quiet nights rest in comfy rooms with a roaring fire, we did another acclimating hike high up the slopes of Ixta.


Then it was on to the Alztomoni climbers lodge located near a microwave tower at 13,000 ft near the trail head for Ixta. At 1am we woke up for our alpine start to find it raining...not a good sign. We waited at the lodge for an hour and a half to see if the rain would stop and at 330am decided to go for it anyway. Our route was the "knees route" finishing up on the Arista del Sol. As luck would have it, the rain did stop and we managed to summit Ixta at 17,000 ft in the fog. We were robbed of our views, but we gained the summit!

After a quick descent back to Guillermo and the waiting van we had a bumpy ride down to our hotel in the ancient city of Cholula for a shower, good dinner and some well-deserved rest. The next day was for resting and exploring the Cholula's pyramid (The largest in the world), some markets and the neighboring cosmopolitian city of Puebla where we ate a fine dinner consisting of some of the best mole I've ever had.

All rested up and our bodies recovered at a lower altitude, we traveled to our next objective and the main event...Pico de Orizaba. Once again the weather forecast didn't look great. On our 4wd trip up to base camp it was raining hard and we got stuck in the mud four times. Luckily Zeb and Holly were headed down from a successful ski summit of Orizaba and we were able to switch vehicles with them which got us through the mud on on to the hut at Piedra Grande basecamp.


With the forecast calling for more rain and snow, we awoke very early at 1am on Mexico's Day of the Dead for our summit attempt. The skies were clear, but we really didn't think it was going to last so we wasted no time and set a quick pace up the lower scree slopes towards the route finding crux known as the "Labyrinth". Large lightning storms far off over Veracruz lit up the mountain, but were so far away they posed no risk..yet.

Donning crampons and ice ax for the first time of the trip, we quickly made our way through the labyrinth and on to the Jamapa Glacier, a moderately pitched but exposed slope with no crevasses. As always, the crux of the day is the last heavy-breathing hour up 38 degree slopes to the crater rim at 18,200 ft. The weather was holding but the clouds in the near distance were gathering. No thunder yet, which would of course turned us around immediately. At 745am John, Eric and I stood on the summit of North America's 3rd highest peak at 18,491 ft!


Then it was a quick descent and an afternoon of traveling back to a hotel in Puebla for a shower and rest. We celebrated Dia de Los Muertos or "Day of the dead" by having a celebratory steak dinner at an Argentinian steak house with some fine Mexican red wine produced by my families vineyards in Baja California. An awesome trip all round and thanks to Huracan for making everything happen so smoothly as usual and to Eric, John and Ken. And congrats to Zeb for his successful ski of Orizaba.  I'm already looking forward to more Mexico Volcanoes adventures this Jan and Feb!

Dave Miller

Stoves: White Gas vs Cartridge

The age-old argument over which type of fuel is best for back packing stoves may never die. But here is a mostly impartial breakdown of the pros and cons of both types of fuels from our experience.

What we are talking about here is the debate between using a liquid fuel stove such as white gas or using a cartridge with a butane mix. Both types of fuels have their place, but there are also situations where one over the other is the smart choice.

A white gas stove is far more efficient and economical if you are cooking or melting snow for a large group or for extended periods. They are also more environmentally sound since there are no disposable canisters. In addition, white gas is the choice for cold temperatures below freezing. The disadvantages of a white gas stove is that they are trickier to operate, require priming and the stove unit is heavier.

A canister stove is far lighter and far easier to operate and is a great choice or one or two people on a 2-4 day trip in above freezing temps. The disadvantages are that they just don't work well in colder temps as the fuel canister needs to stay warm in which to operate properly. Not a problem in the summer or if you are using it for a short period of time in the winter. Another issue is that the number of canisters required for a larger group or extended trip make them much more bulky than white gas. The same goes for the cost of fuel on bigger trips.

Hope this helps. We have both types of stoves. You will find us using white gas on most of our guided group trips. But if we are going light and fast on our own, you may find us using a Jet Boil or similar canister system.


Gear Review:

Sony Alpha NEX camera systems

(The compact answer for the climber/photographer?)


As an international mountain guide I tend to find myself in some pretty spectacular places. The photo opportunities can be downright breathtaking at times. However, while in the mountains my first focus is on safely guiding my clients or efficiently completing a personal climb and not on photography. Lugging around heavy DSLR photography equipment on technical climbs is simply out of the question. For a long time a pocket-sized point and shoot was the only option. As good as point and shoot camera’s can be, many times I wished I had something that had a bit more control with better optics.

Enter the new mirrorless interchangeable-lens category of cameras. Many of them have the same control features, lens optics performance as an entry-level to mid-range DSLR as well as a large sensor…but at a fraction of the size and weight. They come in just about right in between a point and shoot and a DSLR in heft. Thinking this could be my answer, a year ago I purchases a Sony NEX 5N mirrorless lens camera with a 18-55m zoom lens. I couldn’t have been happier with my decision.

The first big test of my new Sony NEX was a guided climb of the Matterhorn in Switzerland. I left it in a Mountainsmith weather resistant, padded case around my shoulder for the entire day. Have to say I barely noticed it, and some sections of the Matterhorn require vertical climbing. When I needed it, there it was ready to go. It also fits nicely nicely in the top pocket of a 30-liter pack (it still wont fit in a pants pocket though!). It comes with me on most of my longer climbs now when a pack is involved and I’ve since purchased a small neoprene camera cover that protects well but is smaller than a regular case…a camera cozy!

Unlike my point and shoot, I have the option of manually controlling my camera with the usual options of full manual, program, aperture or shutter modes as well as ISO and all the other modes you would find in an entry level DSLR. Even in full auto mode the photos came out superior to what my point and shoot could do. Honestly, while on a climb I’m mostly shooting in full auto or maybe aperture mode. But while back at camp or the hut it’s great to be able to switch over to one of the manual modes and have more control over my shots. Not to mention a much better lens.

Next to a DSLR the big thing you lack in a mirrorless camera is, well, the mirror. The lack of a mirror is the biggest reason the camera is made so small. This means you can’t have an optical viewfinder and must use either the LCD screen or an electronic viewfinder, depending on the model. Even though Sony’s EVF is one of the best in class it’s still a bit like looking through a TV screen. I found myself getting used to it though. One other drawback compared to a DSLR is less lens choices since the lens mounts are proprietary, but that is changing (Zeiss lenses are becoming more common for NEX systems now).

Let me state that I am not professional photographer and would be more defined as an enthusiast. However, I am always striving to get more serious about my photography and it’s hard to do that with a point and shoot. I also run two websites that display a lot of photos. The Sony NEX system has been reviewed very favorably by the pros. Here’s a great review of the new Sony NEX 6 by Digital Photography Review.

Sony makes four models of NEX cameras: the NEX 3 entry-level model, the NEX 5 packed with more features, the NEX 6 that offers full DSLR control and the NEX 7 professional model with a larger sensor. The Nex 3 through 6 models come with a 16.1MP APS-C Size sensor and the NEX 7 a 24MP sensor. The NEX 3 and 5 have touchscreen controls and the NEX 6 and 7 have DSLR style controls. I just upgraded to the NEX 6 for full DSLR dial controls and a few more shooting features than the 5. Having to access a touch screen menu while at a belay station was just too tedious. I didn’t see much difference between the 6 and 7 except for the extra megapixels, which I didn’t think I needed (or had the space for on my hard drive!). Check out more technical info at Sony.com.

So far I’m very happy about my choice and feel that I have a compact camera that will grow with me as I get more serious about my photography. Most importantly, I have a high quality camera that will actually come with me on the climb!

by Dave Miller
IAG/CAG owner/director


Peak Profile:

Mont Blanc

Mont Blanc, at 15,780 ft, is the highest peak in Western Europe and the EU. Until the 1980’s it was mostly considered to be the highest peak in all of Europe until geographers decided that Mount Elbrus in Russia was actually within Europe (and 3000 feet higher). Plus, before the Soviet Union fell apart Mont Blanc was much easier to access!

Mont Blanc, also known as Monte Bianco in Italian, means “white mountain” in english and straddles both France and Italy. The French side is predominately glaciers while the wild Italian side takes on a different character with massive rock ridges comprising some the most difficult and classic alpine routes on the continent such as the “Inomminata Ridge”, the “Peuterey Integral” and the “Central Pillar of Freney” among others. The French side boasts the two most popular and easier routes on the mountain, the standard “Gouter Route” and the longer “Three Monts Route”. The French side is also a popular ski mountaineering objective in the spring via the Grand Mulet route.

The mountain is steeped in alpine mountaineering history. It is the site of the birth of mountain climbing as a sport when in the late 1700’s a wealthy Frenchman put up a large sum of money to anyone who would dare be the first to climb it. In 1786 two Frenchmen, Jaques Balmat and Michel Passard set out from Chamonix clad in the costume of the day. They summited on Aug 8th and heralded the beginning of modern mountaineering.

In the very late 1800’s a plan was hatched to build a train route all the way to the summit via tunnels under the glaciers. Fortunately, the project ran out of money and the train currently stops low down at about 8000 feet and now provides access to the Normal climbing route.

In other interesting Mont Blanc history, in 1966 an Air India flight carrying 117 people misjudged their approach to Geneva and smashed into the Bossons Glacier killing everyone on board including the designer of India’s first nuclear weapons. Just last year, some tourists found an Indian diplomatic pouch melting out of the glacier from that same crash and it was returned to India.

Mont Blanc also has the dubious distinction of being one of the deadliest peaks in Europe. More mountaineering accidents happen here than anywhere else in the Alps due to it’s high altitude and the presence of objective hazards on the two most popular routes. But, with up to 20,000 people attempting the peak each year the per capita accident rate is really not that bad.

Regardless of the hazards of the mountain, Mont Blanc is a great objective for climbers who are experienced in Alps climbing or for those going with a qualified guide who can mitigate the hazards. While not technically difficult, climbing the EU’s highest peak is very physically challenging. However, the views of the entire Western Alps and the chance to walk in the footsteps of mountaineering history are well worth the effort!


Training for Mountaineering

Most mountaineers are goal-oriented individuals.  They are in search of a physical and mental challenge that will push their limits, including everything from sleep-deprived alpine starts, carrying heavy loads, loss of appetite, rock and ice climbing in thick boots, extreme weather temperatures, and the ability to stay flexible and positive. 

As a guide, I have seen many folks show up to the trailhead without training at all for the planned trip. The only element of mountaineering that can be controlled is training and preparation. Hard work and dedication to training will add depth to your mountaineering success.

This article outlines the approach to completing a training program for a standard 3-day mountaineering climb, with approximately 7000 feet of elevation gain, carrying a 40 lb pack (comparable to climbing Mount Rainier or Mount Shasta).  The training program will consist of strength training, cardiovascular endurance training, and the requisite mental training it takes to complete the program.

This type of 3-day climb requires an average of 10 hours of training per week for approximately 16 weeks.  The time is divided for 2-3 strength workouts, cardiovascular training, and long hikes on the weekends with a pack. If you have a restricted schedule due to work commitments, it will require extra logistics planning to ensure that you can complete workouts, taking into account considering drive time to and from your workplace.

Ascending a mountain uses different muscle groups than descending. Your strength training should incorporate a balance of upper body, lower body, core and balance.  My training programs for the inexperienced mountaineer typically target all the major muscle groups first and then proceed to focus on any muscular imbalances that may arise. A certified personal trainer who can advise you in-person can be a powerful tool in  helping an aspiring mountaineer define these specific areas and focus their training to strengthen them.

In addition to boosting overall fitness, strength training will prepare you for crossing streams, walking on snowy slopes, tackling low angle glacier terrain, and hiking on talus.  The strength training should focus on glute strength (including such exercises as lunges, squats, single leg deadlifts, bosu training, and step downs). Upper body exercises, such as standing rows, lat pull downs, shoulder internal & external rotations, and rear delt raises, will also strengthen the back and prepare it for carrying weight.  Further, strength training can incorporate a lot of balance, by practicing cable rows while standing on an unstable surface, doing pushups on half foam roller, and bicep curls while standing on one leg.

Cardiovascular training will be necessary throughout the training program. The majority of my training programs incorporate only the activities and equipment that are accessible to the client, for this reason I often prioritize cardiovascular training that can be completed outside.  In my own life, I find that cycling, swimming, trail running, and hiking with a pack on are all accessible cardiovascular activities that I can squeeze into my schedule without a ton of preparation or emphasis on equipment. 

On days when the weather is terrible or you experience unexpectedly difficult time management; you can be creative with what you can do in the gym. The Versaclimber (a standing climbing simulator that many gyms will have on their cardio floor), spin classes, group exercise and full body conditioning, and running on the treadmill are all great options for improved.

by Lynette Talbott
ACSM Certified Personal Trainer

So you want to climb the Matterhorn.

What does it take?

Not many peaks in the world are as iconic and recognizable as the famous peak straddling Switzerland and Italy know by the Swiss as The Matterhorn. So it stands to reason that climbing the Matterhorn is a major goal of many climbers. But what does it take to scale this famous peak? We will take a look at what it takes to climb the Hornli Ridge from Zermatt, Switzerland, by far the peak’s most popular route.

A climb of this nature is not easy to describe to climbers who have not been to the Alps. A common question is “What is it rated”? The answer to that question is probably 5.4 in the US rock rating system. However, that doesn’t even begin to tell the whole story. The Matterhorn is a classic alpine rock climb with some snow and ice near the top. This means you must climb it in lightweight alpine climbing boots and sometimes with crampons on. This of course adds to the difficulty and can take some getting used to.

The day starts usually around 4am at the Hornli Hut at an elevation of 10,600 ft and the summit is at 14,692 ft. That means there is approx. 4000 ft of steep climbing to be done in less than 10 hours. Most of the Hornli Ridge is probably 3rd & 4th class scrambling with occasional sections of easy 5th class. There are even some vertical fixed ropes which must be climbed hand over hand. The climbing is relatively easy for those with rock climbing experience, but very exposed. When with a guide, you are moving roped together without an anchor for much of the route. As with many peaks, you want to be done and back at the hut by mid afternoon at the latest, so you can see that speed is of the utmost importance. There are no real breaks on the climb. The way down is the same way you go up and it’s not really any easier. It’s go, go, go for 8-10 hours.

The need for speed, the sustained nature of the climbing and scrambling, as well as the altitude all combine to make the Matterhorn a very athletic endeavor. Being in excellent cardio shape is key to success. Having rock climbing scrambling skills are also key, you must be sure on your feet! Also, the exposure is massive. We are talking 4000 foot sheer drops down to the glacier. You must be comfortable with exposure. And of course, you must be acclimated before attempting such a climb above 14,000 ft.

In the years that I have been guiding the Swiss Matterhorn, I’ve seen 5.10 rock climbers with no previous Alps experience struggle. I’ve also seen veteran peak baggers in great shape and with good scrambling skills, but with no real technical rock experience, do great.

All said the Matterhorn is not an exceptionally difficult alpine climb if attempting with a guide (route finding can be tricky if attempting on your own). It just requires excellent physical shape and a skill set that allows you to move fast and efficiently on exposed rock.

Conditions are always a concern when planning a Matterhorn climb. Since the Matterhorn is primarily a rock climb a summer snowstorm (not uncommon in the Alps) can put the route out of shape for climbing. Snow covered rock makes the route just too dangerous and slow going to attempt reasonably. Some snow may be ok but too much and you might as well set your sights on one of the other fantastic alpine climbs in the Zermatt area. The picture shown above is the Matterhorn in summer, but clearly out of shape for climbing.

All in all, the Matterhorn can be one of the more memorable days of your climbing career!

by Dave Miller

IAG/CAG owner/director and IFMGA internationally certified mountain guide

Gear Tip:

Klean Kanteen Insulated Bottle

I like equipment that serves more than one purpose. I’ve found that in the Klean Kanteen insulated bottle. It’s my extra water bottle, my camp mug and my thermos all in one.


It’s a double walled bottle, not a thermos. The big difference here is that it holds more liquid for it’s size. No, it’s not quite as insulated as a thermos but I still seem to have hot tea 4 hours into a cold high altitude climb. The 16oz size also makes a perfect camp mug. They even sell a mug top for it separately, but I don’t see the need for it personally.  Sometimes I only really want to carry 1 ½ liters of water on a climb so the 16oz insulated bottle is perfect along with one of the non-insulated one-liter bottles.

Klean Kanteen makes a full line of metal bottles that are a safe BPA-free alternative to plastic bottles. Check them out at: Klean Kanteen

by Dave Miller

IAG/CAG Director